Showing posts with label recipe. Show all posts

Tuesday, September 20, 2011

Soup, soup, soup!

I finally have found the inspiration to post another blog -- the perfect recipe!  While I've been making some new dishes since living in Dallas, I haven't found anything that I've particularly fallen in love with.  That all changed tonight. 

About two weeks ago I decided to try a new soup recipe.  The ingredients sat in my kitchen for weeks while I neglected the stove, this blog, and my own joy and satisfaction from cooking was a fond but distant memory.  As I drove home from work tonight, I chose to cook instead going for a run.... and boy, I'm glad I did!

I assume the butternut squash I used was still fresh even though it had been untouched since coming home from the grocery store weeks ago.  (oops).  This soup is EASY-PEASY.  I wasn't even sure I would like butternut squash, but since I know I enjoy eating other squash, I thought this recipe was something worth trying. 

Next time I make this, I'm going to try roasting the squash in the oven for 40 minutes with olive oil, salt, pepper, and garlic.  And I might add an extra 1/2 cup or so of chicken stock.  After adding in the cream cheese, it thickens up a bit, so the extra liquid might help it out.  I'm excited to try this soup tomorrow after the flavors have blended together overnight.  Yum!

Enjoy!

Butternut Squash Soup

6 cups peeled and cooked butternut squash (about a 2 lb squash)
3/4 medium yellow onion, chopped
4 tablespoons butter
1/2 teaspoon dried marjoram
1/4 teaspoon cayenne pepper
1/4 teaspoon paprika
1/2 teaspoon black pepper
3 cups chicken stock
8 ounces philadelphia cream cheese

1. Cut butternut squash in half and scoop out seeds.  Place cut side down on plate and microwave 8-10 minutes.

2. Let squash cool to touch and then peel away skin and cube.

3. In a large pot over medium heat, sautee onions with butter until tender.

4. Add in cubed squash, dried marjoram, cayenne, paprika, black pepper, and chicken stock.  Bring to a boil and simmer for 12-15 minutes.  Squash should be fully cooked and tender by now.

5. Puree squash soup and cream cheese in a blender or food processor. 

6. Return to pot to slightly warm again.  Do not let boil.

Bon appetit!!!!

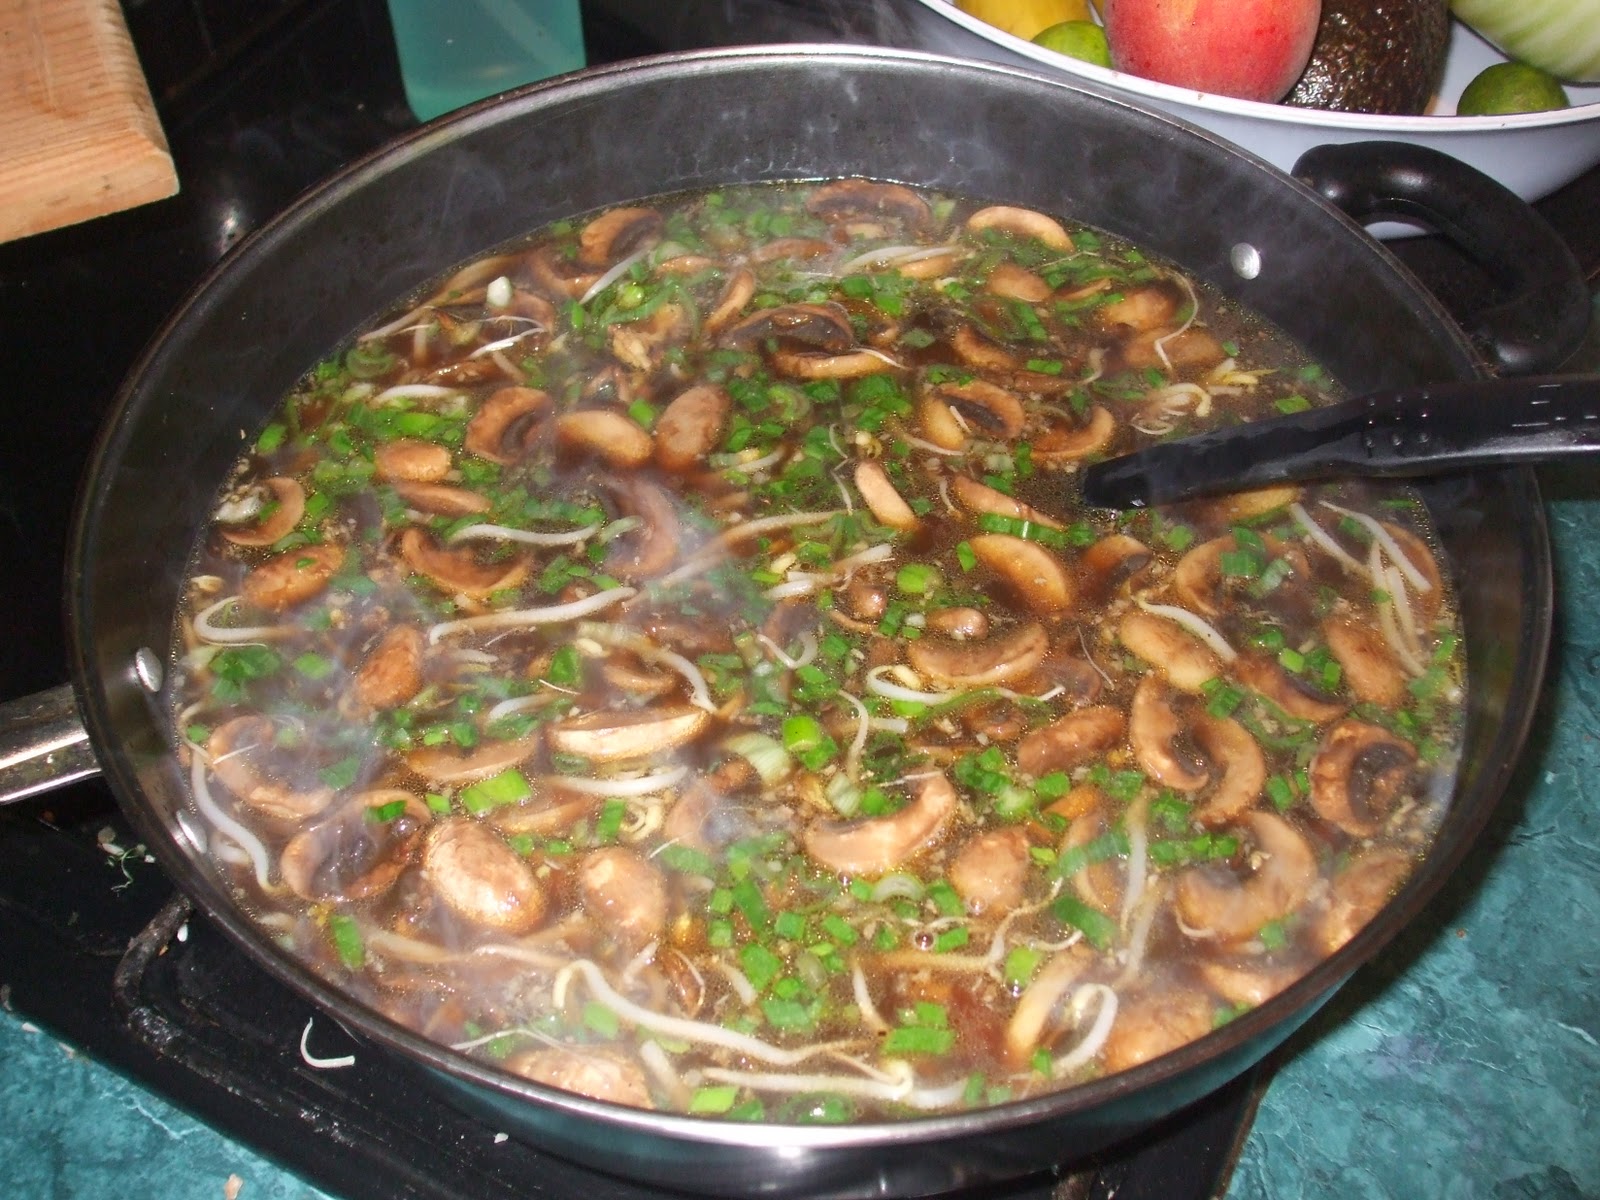
Everything in the pot before I stirred it up.  Such pretty fall colors.

Butternut squash soup!

Thursday, June 23, 2011

Rice and Grains, Part I

Every meal needs a healthy side dish (other than the obvious vegetable).  I've started to explore the rice and grains food category.  Rice, couscous, and quinoa all make excellent side dishes that each have their unique texture and flavor.  Over the next several posts, I'm going to write some of my favorite rice and grains recipes.  I hope everybody enjoys this mini-series.

Rice Pilaf
2 tablespoons butter
2 oz. broken uncooked spaghetti noodles
1/4 of medium onion, chopped
2 cloves garlic, minced
1/2 cup rice
1 cup chicken broth (or vegetable broth)
salt and pepper to taste

1. Melt butter in a medium saucepan over medium low heat.  Add broken pasta noodles and brown.  Watch this step carefully. 

2. Add onion and garlic and sautee until softened.  Add the rice and mix thoroughly to coat the rice with the butter mixture.  Toast the rice a few minutes, stirring often. 

3.  Add the chicken broth, salt, and pepper.  Cover.  Let sit over low heat for 15-20 minutes.  Make sure the rice doesn't start to burn on the bottom of the pan.  I stir every so often to avoid this.  And, after the rice plumps up, you can always turn off the burner but keep the lid on it to continue the cooking process without burning.  If I turn off the burner, it is usually around the 15 minute mark.

To turn this into a nice vegetable dish, mix in 1 inch pieces of asparagus or diced zucchini at the same time you add in the chicken broth.  I add another splash of stock (about 1/4 cup), too. 

Bon appetit!

Rice pilaf with zucchini still in the saucepan

Rice pilaf and one of my favorite pairings -- honey rosemary chicken

Wednesday, June 22, 2011

The Sauce

As requested, here is the homemade honey mustard dipping sauce that accompanies the breaded chicken tenders.   Biggest key step for this recipe is to make it the night before you want to use it.  It becomes so flavorful by letting the ingredients marry together overnight.


Homemade Honey Mustard Dipping Sauce

1/2 cup mayo
2 tablespoons prepared yellow mustard
1 tablespoon dijon mustard
2 tablespoons honey
1/2 tablespoon lemon juice

1. Mix all ingredients together in a bowl.  Cover and chill in refrigerator overnight.

Bon appetit!

Sunday, June 5, 2011

A new favorite

Don't you love finding a new recipe that everybody devours and loves?  This next recipe is relatively new to us but it has already been repeated several times.  Homemade breaded chicken tenders!  YUMMY!

I have made these to be the main (and only) dinner dish, and then used the leftovers the next day in a chicken wrap or placed over salad greens.  The ideas are endless!

Please remember that when I cook, I almost always make enough for two people, and then some for leftovers -- I guess that makes about 3-4 portions.  This recipe is soooooo good that using 4 chicken breasts tests our temptation limits on getting seconds.  4 chicken breasts, depending on size, should be enough for 3 portions.  (It also depends on what you are serving with this for the meal). 

Breaded Chicken Tenders

4 boneless, skinless chicken breasts, cut into strips
1 egg, beaten
1 cup buttermilk***
1 1/2 teaspoons garlic powder
1 teaspoon paprika
1 teaspoon
1 cup flour
1 cup bread crumbs
1/2 teaspoon salt
1 teaspoon baking powder
vegetable oil to fry

***There is no buttermilk in Mexico.  I let 1 cup milk and 1 1/2 tablespoons white vinegar sit for 5 minutes and then continue with the recipe.  Tonight I used lemon juice instead of white vinegar and I actually liked the taste even better.  I imagine with plain buttermilk the flavors will be similar. 

1. Mix egg, buttermilk, garlic powder, and paprika.  Pour over chicken strips in a ziplock bag.  Refrigerate at least 4 hours and up to 24 hours. 

2. Combine flour, bread crumbs, salt, and baking powder.  Mix well.

3. Take each chicken strip out of the buttermilk marinade and place in the flour mixture.  Coat each chicken strip well and place on a plate until ready to fry. 

4. Heat oil to 375 degrees (190 C)

5. Fry chicken strips until golden brown, about 10-12 minutes.  This usually takes 2-3 batches. 

Bon appetit!


Saturday, March 26, 2011

The Little Chicken that Could

There is an amusing story about this next recipe.  If not amusing, it is, at the very least, educational. 

Just before Christmas vacation, we decided to try this whole chicken roast.  The recipe clearly states the amount of time necessary to cook but somewhere, somehow inbetween converting kilograms into pounds (time based on weight of chicken), I completely screwed up.  I underestimated how long we needed to cook it by about 1 hour.  (I did it for 55 minutes).  We undercooked the bird and ended up cutting off all the meat and then continued cooking in a skillet, thinking that would be faster.  I ended up spending my Christmas vacation with a terrible parasite.... and this cooking fiasco might be to blame. 

SO.  I knew the recipe had great potential and I finally got the nerve to try it again.  This time, I cooked it for just under 2 hours and it was perfect.  Well worth all the time spent marinating, letting the chicken rest at room temperature, the rub and seasonings, and the long amount of cooking time. 

Lesson learned:  make sure you cook the chicken long enough!  I had never cooked an entire bird before, so I didn't have knowledge of what a "normal" cooking time should have been.  Use the thermometer!

Peruvian Syle Roast Chicken

Buttermilk Soak
3 cups buttermilk
2 crushed garlic cloves
4 tablespoons white wine vinegar
2 tablespoons salt

Peruvian Style Rub
1 full head of garlic
1 teaspoon EVOO
4 tablespoons softened butter
1 tablespoon paprika
1 teaspoon turmeric
1 teaspoon cumin
1/2 teaspoon salt

3-4 limes
3-4 springs fresh thyme, destemmed and chopped
1/2 cup chicken stock
3-3.5 pound whole chicken, rinsed and tidied up

1. Mix together all ingredients for the buttermilk soak.  Soak the chicken in the buttermilk brine for 3-4 hours.  I place the chicken in a large ziplock bag and then pour all the liquids over it.  Place in refrigerator and turn occasionally.

2. Roast the head of garlic. Slice off the top of the head, exposing all the cloves. Drizzle the oil in between all the cloves, and wrap the whole thing up in foil. Bake for about an hour at 350 degrees.  (I use my toaster oven).

3. Squeeze all the tasty roasted garlic out into a small mixing bowl.  Add the butter and spices, and the juice of one of the limes, and make a paste.
4. Remove the chicken & brine from the refrigerator.  Rinse the chicken and pat it dry.  Rub the paste under the skin of the breast and thighs and then over the entire chicken. Tuck one or two quartered limes in the cavity and truss the chicken loosely.
5. Allow the chicken to come to room temperature, and the paste to season the chicken, for about 30 minutes.
6. Preheat the oven to 375 with the rack in the bottom third of the oven.
7. Slip in the chicken, back side down, onto a roasting pan and then place in the oven.  (In the states, I will probably use my Dutch Oven, but for down here, I bought an aluminom roasting pan and placed it on a baking sheet.)
8. The chicken needs to cook for a long time.  The only reliable test is a thermometer reading of 160 degrees.  I started checking mine at the one hour mark.  Mine cooked for 1 hour and 55 minutes.
9. Remove the chicken and juices from the roasting pan and put it on the stove in a large skillet with deep sides.  Over high heat, add thyme and 1/2 c chicken broth, then spoon the broth over the chicken. Allow the bird to rest for 10 minutes, then quarter and serve.

Bon appetit!
Buttermilk soak

Peruvian style rub

Letting the chicken rest at room temperature

Out of the oven

In the pan with thyme and chicken stock

Lots of meat!

Saturday, March 19, 2011

Another Shrimp Pasta Dish

Shea and I had some leftover alfredo sauce that we didn't want to spoil.  Alfredo sauce bought from the store is pretty expensive here and I haven't yet had the time to try a homemade alfredo sauce.  I did a quick search for recipes that weren't just the typical "alfredo pasta dishes" and found this one.  I ended up using rigatoni pasta and cremini mushrooms and omitted the parsley because I didn't have any on hand.  The cayenne pepper can definitely add some heat - watch out!  Next time I make this I'm going to try roasting my red pepper beforehand to add some more flavor.  Such a nice, simple dish! 

Peppered Shrimp Alfredo

short cut pasta of your choice (penne, rigatoni, farfalle, fusilli, etc)
2 tablespoons butter
1/2 small onion, diced
2 cloves garlic, minced
1/2 red bell pepper, diced
4 large cremini mushrooms or 1 large portobello mushroom, sliced
1/2 pound shrimp, peeled and deveined
1/2 (15 oz) jar Alfredo sauce
1/4 grated Parmesan cheese
1/4 cup heavy cream
1/2 teaspoon cayenne pepper, or more to taste
salt and pepper to taste
2 tablespoons fresh parsley, optional

1. Cook pasta according to package directions.

2. Meanwhile, melt butter in a saucepan over medium heat.  Add in onion and cook until softened, about 3 minutes.  Stir in garlic, red pepper, and mushrooms.  Cook additonal 3 minutes.

3. Add shrimp to pan.  Cook until firm and pink, then pour in Alfredo sauce, parmesan cheese, and cream.  Bring to a simmer, stirring constantly until thickened, roughly 4 minutes.  Season with cayenne, salt (I didn't add salt), and pepper to taste.

4. Serve over pasta and sprinkle with fresh parsley (optional).

Bon appetit!


Wednesday, March 16, 2011

Fiesta Time!!

In the summer of 2009 I presented a horn recital in Kokomo.  It provided me with a challenge to work towards duing our vacation away from work in Mexico.  It was a wonderful experience to have played a successful recital, to catch up with old friends, and also to see the large amount of support from family and friends.  The recital went extremely well and I was pleased to have planned a reception immediately afterwards.  I provided a buffet of food and drinks for everybody to enjoy.  The following recipe is the homemade avocado salsa that I made for this event.  Everybody raved over it and the entire bowl of salsa was gone before I even had a chance to have some myself!  If you were at that recital and wanted the recipe for the salsa, here it is!!!

Avocado Salsa

1 can of corn, drained
1 can black beans, drained
1 small red bell pepper, diced
1 small onion, diced
5 cloves garlic, minced
2-3 roma tomatoes, diced
large handful of cilantro, chopped
1/3 cup olive oil
1/4 cup lemon juice
3 tablespoons apple cider vinegar
3/4 teaspoon salt
1/2 teaspoon pepper
4 avocados, diced

1. In a large bowl, combine corn, black beans, bell pepper, onion, tomatoes, and cilantro.

2. In a small bowl, mix garlic, olive oil, lemon juice, apple cider vinegar, salt and pepper.  Pour into vegetable mixture.  Mix thoroughly.

3. Cover and chill until party (at least 3 hours).

4. Add diced avocado just before serving.

Bon appetit!

This recipe makes a lot of salsa.  It can easily be halved if you just want a healthy snack for around the house.  The salsa stays good in refrigerator for several days.

Saturday, March 12, 2011

Summertime walks

Another summertime specialty in my house throughout childhood was fresh asparagus.  My mother was known for walking a two mile county road and picking the fresh asparagus that grew wild alongside the road, hidden between overgrown brush and next to corn fields.  As children, we always wanted to accompany her on these walks because it meant riding your bike outside the neighborhood -- such a treat!  As we grew older, we were allowed to go with her during some of the summertime walks and help her hunt for asparagus. 

In Mexico, the asparagus is usually a hit or miss.  Sometimes the crops are great and other times they are already turning bad by the time it gets stocked on shelves.  It's always a pleasure to see fresh asparagus and even more of a pleasure when prepared with this recipe.  Enjoy!

Baked Asparagus

Ingredients

1 bunch asparagus
salt
pepper
PAM cooking spray
2 tablespoons butter
2 teaspoons balsamic vinegar
2 teaspoons soy sauce

1. Preheat oven to 400 degrees.

2. Arrange asparagus on baking sheet in single layer.  Season with salt and pepper.  Spray with PAM. 

3. Bake for 12-15 minutes.

4. Melt butter in small saucepan over low heat.  Brown butter as much as you can before it starts to burn.  Remove from heat.  Add in balsamic vinegar and soy sauce.  Stir.  Pour over baked asparagus for a tasty sauce!

Bon appetit!

It's simple, healthy, and tastes great!  This is a winner!

Wednesday, March 9, 2011

Pizza, Pizza!!

I think I've finally created the perfect homemade pizza crust.  Yay!  The dough rises super easily, it bakes up so that it has just a touch of crunch, but complete dough-i-ness on the inside, and it tastes great with any of your favorite pizza toppings! 

Homemade pizza crust

Ingredients

2 1/4 teaspoon active dry yeast (one .25 ounce package does the trick!)
1 teaspoon sugar
1 1/2 cups water, warmed to 110 degrees F (45 degrees C)  ****see note below****
1 teaspoon salt
1/4 teaspoon garlic powder
1/4 teaspoon onion powder
2 tablespoons EVOO, plus extra
3 1/3 cups flour

1. Dissolve yeast and sugar in the warm water.  Let stand until creamy and frothy, about 10 minutes. 

2. Add in salt, garlic powder, onion powder, and 2 tablespoons EVOO.  Stir. 

3. Mix in 2 1/2 cups of flour.  Knead dough on a well floured flat surface.  It will be quite sticky at this point, but add in more flour (the remaining amount of flour) until it is smooth. 

4. Place dough in a well oiled large bowl.  Cover and let dough rise for one hour.  It should double in size. 

5. Punch down dough and let it form a tight ball.  Let rest for another 2 minutes. 

6. Roll out dough or hand roll directly onto baking pan (that has been sprayed with PAM cooking spray).  Let stand for another 10-15 minutes. 

7. Bake dough for 9 minutes without any toppings.  This will start to give it a crunchy, browned bottom.  Add toppings and cook another 15 minutes.  Adjust cooking times if you want a softer or crisper crust.

Bon appetit!

The absolute key to making any homemade dough is the water temperature.  The water temperature MUST be 110/45 degrees!!!!!  I made pizza crust several times without taking the temperature of the water -- just bringing water up to what I thought was the correct temperature.  Guess what?!  The dough didn't turn out well!  The first time that I accurately measured the temperature I got a COMPLETELY different result.  What I was making before tasted fine, but this was a MUCH better product.

You can use more or less of the garlic and onion powders.  I started to use them for extra flavours and have really enjoyed the addition.  I've found the best amounts for our tastebuds is the 1/4 teaspoon. 

This recipe makes a BIG pizza!

Up close of the crust

Side view of the crust.

Monday, March 7, 2011

Thai Curry

The longer I experiment in the kitchen, the more ethnic the recipes get.  I love the fact that I don't cook the same types of foods over and over and over.  When planning a weekly menu, I usually try for a few chicken recipes, some soups, a few seafood inspired dishes, some Italian pastas, and lately I've been trying out the Asian/Thai food group.  When I saw this Thai Curry dish with Shrimp, I knew I had to try it.

While shopping for ingredients, I ran into a few problems:  I could not find red curry paste (so I used green) and I could not find fish sauce (so I omitted it).  I'm sure the final result was pretty different from what was originally intended, but this came out pretty well.  I'm extremely curious to make it with the red curry paste in the future, as red curry and coconut milk are always a perfect match.  I left the ingredients in the recipe as written in the recipe, but you will notice in the pictures that I do not have a "red" curry sauce so I wanted to mention this upfront. 

The recipe stressed the importance of the fried shallots, but I could have gone without them.  They didn't make (or break) the dish for me.  This is a time consuming recipe, but well worth it if you are in the mood for some homemade Thai food!

Thai Curry Noodles with Shrimp

Ingredients

Lo mein noodles or thin spaghetti, cooked according to package directions
vegetable oil
1 cup shallots, sliced into rounds
salt
1 tablespoon corn starch
2 tablespoons flour
3 garlic cloves, peeled and thinly sliced
1 tablespoon red curry paste
1 tablespoon curry powder
1 teaspoon cumin
1/2 teaspoon turmeric
1 1/2 cups chicken stock
2 tablespoons fish sauce, or more to taste
1 tablespoon sugar
2 1/4 cups coconut milk
1 pound raw shrimp, peeled and deveined
1 tablespoon lime juice
1/3 cup scallions, sliced for garnish
1 lime, quartered for garnish

1. Season the shallots with salt.  Combine the flour and cornstarch and then add this to the shallots.  Toss the shallots so they become coated with the flour mixture.  Shake off excess flour.

2. Heat a medium sized pot over medium heat.  Add a half inch of oil to the pot.  When the temperature of the oil is 325 degrees, fry the shallots until they are crispy.  Don't let them brown too much to avoid a burnt taste.  Removed them from the pot to a paper towel.  Set aside.

3. Combine the garlic, curry paste, curry powder, turmeric, and cumin.  Heat a large pot of medium heat.  Add 2 tablespoons of oil to the pot.  Add the garlic and spices to the pot.  Sear the spices just until fragrant and then add the chicken stock, fish sauce, sugar and coconut milk.  Bring to a boil and then reduce heat to simmer for about 20 minutes.

4. While curry is simmering, cook noodles according to package directions.  Strain and keep warm.

5. After simmering, taste the curry to see if you want to add a touch more of the fish sauce. 

6. Add the shrimp to the curry.  Let them cook until almost done and then turn the heat to high.  Add 1 tablespoon of lime juice and bring the sauce back to a boil and then turn off the heat.

7. Place the noodles in individual bowls.  Pour curry sauce and shrimp.  Top with fried shallots and fresh green onions.  Serve with lime slices on the side. 

Bon appetit!


With the fried shallots

Tuesday, February 22, 2011

Ode to Idaho

Shea is from Idaho.  He loves potatoes.  I am from Indiana.  I love corn.  Shea does not love corn and I do not love potatoes.  That's just the way it is.

Shea and I have taught each other the joys of each food through our family visits.  At my parents house in Indiana he was introduced to sweet corn -- both on the cob and also fried (with lots of sugar!).  During the summer, corn is a staple at my parents house and is usually cooked each night of the week.  You can find a corn stand on just about all the main intersections of the city.  Everybody sells the local corn for pretty cheap and it tastes great!  I have grown up with the highest quality of corn and love it.  I sneak canned corn into many of the meals that Shea and I enjoy together, with Shea never knowing that corn was not one of the original ingredients from the recipe.  (Well, I guess Shea will be clued into this fact once he reads this post.... future usage of corn might dwindle rapidly in this kitchen....).  Ah, the love affair with corn but we must now look at Shea's love of potatoes.  On the very first visit I took to Idaho, the first homecooked meal included 3 different types of potato, each cooked a little differently.  His family insisted that each had its unique flavor which was why all 3 were necessary for the meal to be complete.  I have been taught the proper way to cook a baked potato in the oven (no aluminom foil, people) and also the correct way to split open a baked potato. 

While living in Mexico, we deal with a mildly unfair situation.  The corn is not what I'm used to from Indiana so I use a lot of Del Monte canned corn.  And there is only one type of potato.  And it's not an Idaho, Russet (Idaho grown or not), Red, or Yukon -- we can only buy the standard white potato.  We don't usually have a lot of potatoes because the taste doesn't measure up to Shea's standard.  While I can add canned corn into recipes and get a corn-fix for myself, there isn't much we can do for Shea.  Here is one recipe that I know Shea will LOVE and one that I can't wait to try with some good old Idaho potatoes.

Potato Soup

Ingredients

1 pound bacon, cooked and crumbled
2 stalks celery, diced
1 small white onion, diced
3 garlic cloves, minced
5 medium-large potatoes, peeled and cubed
1 can corn, drained
4 cups chicken stock, or enough to cover potatoes
3 tablespoons butter
1/4 cup flour
1 cup heavy cream
1/4 cup chopped fresh cilantro
pepper

1. In a Dutch oven, cook the bacon over medium heat.  Remove bacon when done cooking and set aside.  Drain off all but 1/4 cup of the grease.

2. In the bacon grease remaining in the pan, sautee the celery and onion until the onion begins to turn clear.  Add the minced garlic and cook additional 2-3 minutes.  Add cubed potatoes to pan and cook 3-4 minutes.

3. Return bacon to pan and add corn.  Toss well to mix.  Add in enough chicken stock to fully cover potatoes.  Let simmer until potatoes are tender (a good 10-15 minutes, maybe longer). 

4. In a separate pan, melt butter.  Whisk in the flour, stirring constantly.  Once flour is fully integrated whisk in the cream and cilantro.  Stir constantly while bringing to a boil.  Let the cream thicken. 

5. Stir cream mixture into potato soup.  Add pepper according to taste (one could also add salt here, but I didn't because I thought there was enough with the bacon grease and chicken stock).

Bon appetit!

The recipe this was taken from suggests blending half of the soup into a puree, but I felt that the potatoes easily broke apart when stirring the soup.  I enjoyed the larger chunks of potato and am glad that I chose not to puree some of it. 

Friday, February 11, 2011

Always a winner

THIS recipe is an all-time favorite and always a winner in the Mayfield household.  Traditionally prepared as an evening meal before my mother had her monthly Women's Euchre club meetings, this meal can be considered for breakfast, lunch, dinner, or even dessert (nah, not really, but it is so good it should be allowed as a dessert)!  I began making this recipe on my own in my first year of college.  My best friend, our dorm RA and mutual friend, and myself all decided we wanted a fancy breakfast one Sunday morning so I called up my Mom for this recipe.  My first success as playing the role of hostess took place in a tiny dorm kitchenette.  My best friend and I continued making these on a regular basis throughout the remaining years at college.  Such a history with this dish!!  It is an old family recipe, passed down through several generations from my Dad's side of the family.  I asked my parents for permission to use on this blog and they both said it was fine. 

Swedish Pancakes (OH YEAH, BABY!!)

Ingredients
2 cups flour
2 tablespoons sugar
1/4 teaspoon salt
pinch of baking powder
3 eggs
2 cups milk
1/4 stick butter, melted
extra sugar
extra butter
2 packages frozen strawberries in a sugar sauce (ahhh. Not living in the US makes it difficult to describe this.  Hopefully my Mom or sister can leave a comment about brand and quantity and then I will edit here)

1. In a large mixing bowl, combine eggs and milk and beat until frothy. 

2. Add flour, sugar, salt, baking powder, and melted butter.  Mix well.

3. Heat frozen strawberries over low heat.

4. Heat a medium sized skillet over medium-low heat.  Spray with PAM cooking spray.

5. Using a large ladle, scoop a spoonful of batter into skillet (about 1/4 cup).  Tilt the pan in a circular motion immediately so the batter spreads evenly to all edges.  The trick is to pour and tilt at the same time while evenly dispersing the batter.  If you need more batter to cover entire pan bottom, add it quickly.  These are supposed to be pretty thin pancakes -- think along the lines of a crepe.

6. Cook about 1-2 minutes until light brown.  Little bubbles start forming and you know it is time to flip it.  Brown both sides. 

7. Remove from pan.  Lightly butter and sprinkle sugar over the hot pancake.

8. Repeat steps 5 through 7 until enough pancakes are ready to serve (see sidenote below about portions)

9. When all 4 pancakes are finished, buttered, and sprinkled with sugar, place in a stack in middle of a plate.  Place spoonfuls of strawberries in middle and then roll like a burrito.  Place more spoonfuls of strawberries and sauce on the outside. 

BON APPETIT!!!!!!!!!!!!

When my family eats these, we pig out.  Nobody counts calories, watches portion sizes, etc....  One serving is usually 4 pancakes.  And then there are usually a few requests for seconds.  The only downside to this recipe is that one person is stuck at the stove cooking while everybody eats their portions as they are ready -- best eaten HOT.  My mom always made bacon and sausage links on the side. 

I have started making these down here for Shea.  He enjoys adding whipped cream and we have used both frozen strawberries and blackberries.  The strawberries are my personal preference, but I imagine that any type of frozen fruit could be used.  We have been watching our calories and portions down here lately, so I have been making 3 pancakes per serving (and no seconds!).  It is just as satisfying and you don't feel so awful afterwards.  =D

Action shot of pouring batter


Browned pancake


Finished product


The page in my recipe book from my Mom.  You can see how dirty and worn the pages have become for this recipe.  And apparently my mom thought I could figure out everything besides the ingredients on my own.  I think it took a little trial and error but is an easy recipe once you get the hang of cooking time for each pancake.

Wednesday, February 9, 2011

Pardon me, but would you have any Grey Poupon?

Creamy Chicken with a Dijon Mustard Sauce

Ingredients

3 chicken breasts or 6 chicken thighs
8 garlic cloves with skin on
herb of choice:  4 sprigs of fresh thyme, or 4 sprigs of fresh rosemary, or 5 sage leaves (thyme and rosemary should be de-stemmed and chopped)
2 tablespoons butter
3 tablespoons EVOO
2 tablespoons Dijon mustard
1/2 cup white wine
1/3 cup cognac (or peach juice)
1 cup chicken stock
1 container button mushrooms, sliced
1/2 cup cream
1 tablespoon flour
salt, pepper

1. In a large enough pan, add the butter, EVOO, garlic cloves, and seasoning of choice over medium heat.  When the butter starts to sizzle, add the chicken and let them get golden brown on each side.  They will be cooking later so you just want to get the golden brown now.

2. Heat the chicken stock in a small pot.

3. Remove chicken from pan.  Add the white wine and cognac (or peach juice) and deglaze the pan.  Let the alcohol evaporate completely, then add the dijon mustard and dissolve in sauce with a whisk.

4. Return chicken back to pan.  Add the hot chicken stock and sliced mushrooms.  Season with salt and pepper and let simmer over low heat, covered, for 20 minutes.

5. Remove the cooked chicken and keep warm.  Let the sauce simmer over low heat to reduce as much as you like (hardly none at all, for me.  The more sauce, the better!).  Squeeze the garlics in the pan to release more flavor, then discard the flaky skins.  Also remove the sage leaves at this time if you chose sage as your seasoning.

6. In a separate bowl, dissolve flour in 3 tablespoons of the cream.  Add the remaining cream and stir.  Add a small spoonful of the hot wine/mustard/stock sauce.  Whisk together very well and slowly pour into the pan.  Keep stirring so the sauce doesn't stick to the bottom of the pan. 

7. Let the sauce warm through and reduce slightly. 

8. Pour the sauce over chicken and serve immediately. 

Bon appetit!

This recipe is amazing!  (I know, you're thinking that anything made with a cream sauce can't be too shabby, right?!??)  I've made it twice in the last two weeks - once using fresh thyme and again using fresh rosemary.  The original recipe calls for sage leaves, but I don't have any available.  I do have some ground sage that I'm going to try next time.  I served rice pilaf and sauteed spinach alongside this.

Cream sauce with thyme


Friday, February 4, 2011

Changes Pho Sure

I remember quite well my first experience with ethnic foods.  Sure, I had been to some college town Chinese restaurants whose food was dumbed down to American styles, but I had never been to restaurants of authentic Thai, Indian, or Vietnamese.  Born and raised in the midwest, I was very much a meat and potatoes type of gal.  When my horn professor wanted to meet over lunch at a local Vietnamese restaurant, I tried to be polite and agreed to the restaurant choice.  Once I stepped into the restaurant I realized that I had no idea what any of the menu items were or even what I might possibly find pleasing to my (then very restricted) palette.  Turns out that I hated it.  I got a soup and tried to stomach as much as possible.  I left the restaurant with a very judgemental view of not only Vietnamese foods, but also of all other ethnic foods - even though I had never tried foods such as Indian or Thai. 

Over the years I have grown to LOVE all types of food.  My food palette has matured.  I recently went through one of the earliest cookbooks that I received.  In that cookbook I had placed sticky notes on pages that contained a recipe of interest and I always rated the recipes once I did try them.  All the old sticky notes were still in place.  I found it very interesting how many different recipes sounded simply fantastic but did not have sticky notes!

This recipe is one that reminds me so so so very much of my first experience with Vietnamese food.  Everytime I make this, I think of my lunch meeting with my horn professor and always smile to myself.  I really hope you enjoy this Vietnamese style pho soup!!!

Hot 'N Sour Chicken Soup

Ingredients

tagliatelle noodles
5 boneless, skinless chicken thighs
salt, pepper
1 1/2 teaspoon ground coriander
2 tablespoons vegetable oil
1 package button mushrooms, sliced
grated ginger root, about one inch
4 cloves garlic, minced
1/4 cup rice wine vinegar
1/4 cup tamari soy sauce
6 cups chicken stock
2 tablespoons cornstarch
2 tablespoons water
1 bunch green onions
1 cup bean sprouts
fresh cilantro, chopped
Sriracha hot sauce

1. Season chicken thighs with salt, pepper, and coriander.  Cook about 5 minutes on each side and set aside.

2. Bring large pot of water to a boil for tagliatelle pasta.  If the pasta is in little balls of noodles, I usually do about 4 balls per person.  Only make enough for that current meal.  When making leftovers, I always do the noodles fresh.  Cook tagliatelle according to package directions (usually a fairly short amount of time).

3. In a large, deep skillet, stirfry mushrooms in vegetable oil.  Add fresh ginger and garlic.  Stir until fragrant.  Be careful not to let the garlic burn. 

4. Add in rice vinegar.  Stir.  Add tamari soy sauce and chicken stock.  Stir.  Bring to a boil.

5. Slice cooked chicken thighs into bitsize pieces and add to soup. 

6. Combine the cornstarch and water in a small bowl.  Mix well.  Add to soup and let thicken for a few minutes.

7. Add chopped green onion and beansprouts to the soup just before serving.

8. Place one serving of cooked noodles in a bowl.  Add desired amount of sriracha hot sauce.  Then place ladles of soup into bowl.  Garnish with fresh cilantro.

Bon appetit!

I tried to be sneaky and stretch a buck and make this a bit healthier by using only 4 cups chicken stock and 2 cups water, but Shea immediately knew something was different.  He insists that only chicken stock should be used in this recipe.  And, as stated above, I always boil the tagliatelle the day of eating, never pre-cook and store.

Be careful with your amount of Sriracha!  The first time I used WAY too much and learned to scale back.  My bowl is on the right, Shea's bowl on the left.


The finished soup


Wednesday, January 26, 2011

A Creamy Culinary Creation

I love this recipe so much but can't figure out a good introduction for it.  So.....  I hope you enjoy it as much as I do!

Creamy Mushroom and Chicken Linguine

Ingredients

linguine pasta
2 chicken breasts
EVOO
2 garlic cloves, minced
handful of button mushrooms (maybe around 8-9), sliced
1/2 small white onion, diced
1 chicken bouillon cube, crumbled
1/2 cup water
1 cup heavy cream
3/4 cup milk
green onions, chopped

1. Cook pasta according to directions on package.  Drain. 

2. Season chicken breasts to your own desire (For this recipe, we usually season with pepper, montreal chicken spice, and lawrys seasoning salt).  Heat EVOO in large skillet and cook chicken, approximately 6 minutes each side.  Remove chicken from pan and place aside, covered.  Drain most of the liquid from pan.

3. In the same pan, sautee garlic, mushrooms, and onion for about 3 minutes.

4. Add the chicken bouillon cube and water.  Stir until the bouillon cube is completely dissolved.  Bring to a boil and simmer uncovered for 8 minutes. 

5. Add the cream and milk.  Heat until sauce warms through and reduces slightly.  After the heat is turned off, add in a handful of chopped green onions for a nice pop of color and added flavor.

6. Combine pasta noodles and sauce.  Serve one portion of noodles onto a plate and add chicken breast on the side. 

Bon appetit!

This sauce is incredible.  I could happily eat this as just a pasta dish, in fact, I often eat only half of my chicken breast.  We add in the chicken breast to beef this recipe up for Shea.  The last few times we went grocery shopping, they didn't have linguine noodles so I substituted penne pasta.  I knew I needed a pasta that could stand up to the heaviness of the sauce.  Shea and I both preferred the penne pasta instead of the linguine noodles, so I will probably be making this with only penne from here on out. 


Monday, January 24, 2011

Fresh Herbs

If you have paid close attention to my previous recipe entries, you might have noticed that I use fresh herbs as opposed to the dried versions.  When I started cooking in the United States I never once bought fresh herbs.  To be honest, I'm not even sure I knew they existed.  I bought all types of the jarred McCormick spices and herbs and never thought twice about how using dried or fresh herbs could affect the flavor.  My good friend and section mate in the orchestra introduced me to the fresh herb world.  It started with the discovery of a small section of the produce department at Walmart: it contained bags of fresh rosemary, basil, thyme, parsley......  I mentioned this discovery to my section mate and she and her husband both commented on how much they enjoy cooking with fresh herbs.  Later that evening I cooked this recipe using my newly bought rosemary... and I haven't gone back to using dried herbs ever since.  I look forward to growing my own basil and rosemary plants so that I can always have these fresh herbs on hand.

Honey Rosemary Chicken

Ingredients
2 chicken breasts
EVOO
salt, pepper
1 large shallot, finely chopped
2 garlic cloves, minced
3 sprigs fresh rosemary, chopped
1/4 cup honey
1 tablespoon dijon mustard
juice of 1 lemon

1. Heat EVOO in large saucepan.  Season chicken simply with salt and pepper.  Add to pan and cook approximately 6 minutes on each side.

2. After chicken is done cooking, pull out of pan, place on a plate and cover with aluminom foil to keep warm.  Drain most of liquid out of pan.

3. In same pan, sautee shallot, garlic cloves, and rosemary.  If necessary, add more EVOO.  Cook 2-3 minutes until rosemary is fragrant. 

4. Add in honey and mustard.  Stir to create a yummy glaze.

5. Add chicken to pan.  Place glaze all over each chicken breast.

Bon appetit!

We usually pair this chicken dish with a side of vegetable rice pilaf (recipe to be added soon).  The honey glaze is very nice with the chicken and also along with the rice.  A great pairing.

Thursday, January 20, 2011

Spice it up


This is where I live.  About two hours north of a major cruise line stop (Mazatlan), just on the other side of the pond of a major vacation destination (Los Cabos), and 12 hours south of the United States border.  Living in Mexico has had both its' perks and dissappointments.  One huge benefit for living quite close to the coast in Mexico is the abundance of fresh seafood in all the markets.  While growing up in Indiana and Tennessee, and also attending graduate school in Ohio, I NEVER had much interest in seafood.  Who could grow an appreciation for seafood when you live in the middle of a huge country with no access to fresh markets?  I remember that whenever my parents said that fish was on the dinner menu I always inwardly groaned and complained.  The only seafood that I could enjoy eating was shrimp, usually in the form of shrimp cocktails.  After living in Mexico for 4 years now, I have eaten dozens of fish filets (salmon, tuna, white fish, etc), peeled and deveined hundreds (if not thousands) of shrimp, swallowed a few whole oysters, and even gotten to enjoy octopus.  All of the fresh seafood is so ridiculously inexpensive that it allows us to enjoy a seafood dish several nights of the week.  Here is a great shrimp dish that provides an extreme twist on the classic shrimp cocktail appetizer.

Spicy Shrimp Appetizer

Ingredients
1/3 cup sriracha hot sauce
1/3 cup olive oil
1 teaspoon Worcestershire sauce
3 cloves garlic, minced
1 handful fresh cilantro, chopped
1 teaspoon white sugar (some prefer to double)
salt, pepper
16-20 shrimps

1. Combine all ingredients together (except for shrimp).  Mix well.

2. Pour marinade into a Ziplock storage bag and add shrimp.  Shake to cover all shrimp in marinade.

3. Let shrimps marinate for 3-4 hours in the refrigerator.

4.  Remove shrimps from marinade.  Cook in skillet or put shrimp on skewers and cook over grill until shrimp is pink.

5. Heat the marinade and place in a small bowl for extra dipping.  Sour cream also tastes really good with these shrimps.

Bon appetit!

Tuesday, January 18, 2011

Secret Ingredients

I love discovering new flavor combinations.  As I learn more about spices and fresh herbs I am fascinated with how the addition of one ingredient can draw out flavors of others.  I searched for a black bean soup, per request of Shea, and eventually settled on this recipe.  I wasn't too sure of some of the ingredients but after the soup was finished, I was amazed at the wonderful flavor of black beans and cumin.  I was so crazy about this soup that I made up a second batch the very same week and probably had black bean soup 7 days in a row for lunch.  And I never grew tired of the flavors.  Every time you make a black bean soup, you MUST include a few teaspoons of cumin!  It is the secret ingredient in this recipe that makes it a five star recipe.  Enjoy!

Black Bean Soup
Ingredients:
2 cans black beans, drained and rinsed
1 can black beans, drained and rinsed (to be used separately)
1 small can of corn, drained and rinsed
2 cups chicken broth
1 1/2 cups salsa**
2 teaspoons fresh cumin, more if desired

For garnishes:
sour cream
avocado
green onions

**I make my own fresh salsa with mixing these ingredients:
2-3 roma tomatoes, diced
1/2 small onion, diced
fresh cilantro, chopped
pinch of salt, paprika, garlic powder

1. If using your own fresh salsa, prepare it first.  This will give a little extra time for the juices of the tomatoes and onions to combine with the seasonings. 

2. In a food processor or blender, combine 2 of the cans of black beans, corn, chicken broth, salsa, and cumin.  Blend until creamy smooth. 

3. In a large pot add the remaining can of black beans, leaving the beans whole to add texture to the soup.  Add in the black bean mixture from the blender.  Heat until just starting to bubble at the edges, but do not bring to a boil. 

4. Serve immediately with desired garnishes. 

Bon appetit!

Sunday, January 16, 2011

Classic Scampi

This recipe has become a staple in our repertoire.  If neither Shea or I are craving a particular food, this is an awesome 'fall back' recipe that is simple to make and satisfying.  It was one of the first recipes that Shea and I attempted to make together.  It has such a light and refreshing taste but will fill up your tummy! 

Classic Lemon Pepper Shrimp Scampi

Ingredients
angel hair pasta
extra virgin olive oil (referred to as EVOO from here on out)
3 cloves garlic, minced
1/2 cup chicken broth
3 tablespoons white wine
juice of 1 lemon
salt
lots of pepper
1/2 lb. shrimp, peeled and deveined
2 tablespoons butter
fresh basil, chopped

1. Bring large pot of water to boil.  Add angel hair pasta and cook to al dente.  Drain and place back into pot.

2. In a large skillet, sautee garlic with EVOO over medium heat. 

3. Stir in chicken broth, white wine, lemon juice, salt, and a lot of pepper.  Let the sauce reduce for a few minutes. 

4. Add butter into sauce.  Let it melt and then add shrimp and basil.  Cook until shrimps have a nice pink color.  Beware of cooking the shrimps too long -- the longer amount of time shrimp is cooked, the tougher it gets. 

5. After shrimps are done cooking, pour the shrimp sauce over pasta noodles.  Toss to coat all noodles. 

Bon appetit!

After I have served my portion of pasta, I usually squeeze more fresh lemon juice over the top.  Doing so brings out the lemon flavor a little bit more, which I love!  Shea and I have also made this with seasoned chicken breasts or without any meat, just pasta.  Slice a zucchini into thin strips and sautee in the beginning with the garlic and EVOO to add a vegetable to the meal.  The zucchini blends wonderfully.

sauce and shrimp before adding to pasta


Thursday, January 13, 2011

One pepper, two pepper, red pepper, green pepper

It's a tradition.  Every year for Christmas all members of my family receive a calendar for the upcoming new year.  After spending my first four months in Mexico, I went home for Christmas and sure enough, I got my calendar.  It had beautiful pictures of peppers for each month.  With the bright colors and a variety of peppers shown, I thought it was the perfect calendar to hang on the wall of my kitchen.  I know my mom got that particular calendar to place emphasis on my new living environment and the abundance of peppers in Mexico, but she could not have known how much I would come to absolutely love that calendar.  I have even saved the calendar to this day with hopes of framing the pictures and using them as wall decorations in my next home.  I think it is most appropriate for the first recipe of this blog to be.... stuffed peppers!

Ingredients
1/2 pound ground beef
1/2 cup uncooked long grain white rice
1 cup stock (chicken or vegetable)
1 tablespoon butter
4 bell peppers
1/2 of a small white onion, diced
2-3 roma tomatoes, diced
1 jar of marinara sauce
2 tablespoons Worcestershire sauce
1/4 teaspoon garlic powder
1/4 teaspoon onion powder
1/4 teaspoon ground cumin
salt and pepper to taste
shredded cheese

Preheat oven to 350 degrees.

1. Bring stock and butter to a boil.  Add rice, turn down heat, and cover.  Let set until cooked through.  (Approx. 15 min)  Check after about 8 minutes to make sure the rice doesn't need a touch more liquid.

2. While the rice is cooking, bring a pot of water to a boil.  Add peppers to boiling water for at least 5 minutes, making sure the peppers are fully submerged.  This will soften the peppers.  If you like a more crunchy pepper you can omit this step.  After the 5 minutes are up, place peppers into ice water to stop the cooking process.

3. Stir fry the onions until soft and golden.  Remove from pan. 

4. Brown ground beef.  Drain grease. 

5. Into the pan with the beef, add the cooked rice, onions, Worcestershire sauce, garlic powder, onion powder, and cumin.  Stir.  Add in diced tomatoes.  (Salt, pepper, and a dash of paprika or cayenne pepper could also be added.  Whatever you're in the mood for seasoning-wise)

6. Cut the tops of the peppers off and remove all seeds and membranes.  We begin the stuffing process now!

7. Sprinkle a little salt in the bottom of each pepper.  Add a tiny bit of shredded cheese.  Fill the peppers about 1/2 way with the beef mixture.  Now place a thin layer of marinara sauce inside each pepper.  Fill the peppers the rest of the way full with more beef mixture.  Place tops of peppers back on top. 

8. Place peppers in a baking dish (I used a 9x9 glass baking dish).  Cover loosely with aluminom foil. 

9.  Bake for 20 min. 

10. Remove foil and add shredded cheese to the tops of each pepper.  Place back in oven until cheese is melted. 

Bon appetit!

Some people prefer to have marinara sauce in the bottom of the baking dish and also more mixed in with the beef mixture.  The next time I make these I might try this and see how much difference it makes, but I enjoyed tasting each ingredient and not having an overabundance of the marinara sauce.  I added some slices of avocado on the side.  Such a healthy, filling meal!!